Reasons to be Bashful
There’s been some big news in the past week or so, Bash is coming to Windows 10. Now I have to admit, this has got me pretty excited to say the least. For those who don’t know, Bash is an acronym for “Bourne-again shell”, an interactive-shell that is used on UNIX bases operating systems.
Over the past 3 years I’ve moved away from developing on a Windows machine purely to developing on Mac. One of the main reasons for this is due to the terminal. Tooling for Interface Development has become heavily invested in Bash; with tools like Grunt, Gulp, npm, and Vagrant becoming a major part of and Interface Developers workflow; including mine. So much so I have no idea how I lived without them.
The primary reason I am excited about the move towards Bash by Microsoft is due to the way window management works on OSX… I basically find it clunky to use. Maybe it’s just me, but navigating and moving files around is just a real pain. Navigating between windows is also very hit and miss. For example if I have multiple windows open for Chrome, if I CMD + Tab onto Chrome, how do I get to the other windows, not just the last one used? I know pressing the alt key at the same time brings a minimised window to the front, but it just isn’t intuitive†. So the fact that in the future I will be able to use Windows window management and Bash together is perfect!
So what can Bash be used for? Anything and everything would be an accurate answer. If you want do dig down into the inner workings of your computer, Bash is the way to go (NOTE: be very careful with the commands you run. It is quite easy to kill your machine by copying commands from a random forum if you don’t know what they do!).
Here’s a very small selection of what the Bash prompt can do for you:
- Move / copy files and directories around your machine
- Remove files and directories (very powerful, be careful!)
- Open files listed files in your favourite editor
- Find files using the
findcommand, look inside files using thegrepcommand - Edit file permissions
- Piping one commands output to another commands input
- Administer your computer as well as remote machines
- Combine all of the above with its own scripting language
Honestly, the list above is just an incredibly small selection of what you can do with Bash. I’ve been using it for a few years and Im only just scratching the surface of what is possible. It certainly is a powerful tool to have in your toolkit.
My Setup
So I thought I’d give you a small rundown of what I use Bash for, and a set of tweaks & tools I use to make Interface Development a little easier. I’m always interested in hearing how to improve my workflow, so if there’s anything I’m missing let me know!
Dotfiles
There’s no need to stick with the standard Bash setup, you can customise the way bash works by modifying a set of config files (.bashrc, .bash_profile etc). These are known as dotfiles and are usually found in you user profiles home folder. You can modify the look and feel, as well as add custom aliases of commands you frequently use to speed up your workflow. A very useful technique I have used is to store all my dotfiles in a single directory, then symlink them to the correct place in my home directory. Add this single directory to git and hey presto; if your computer dies you can easily restore your Bash profile setup. A very in-depth tutorial on how to do this can be found here.
If you are interested in seeing what other developers do with their dotfiles I highly recommend you check out https://dotfiles.github.io/. Here you will find a huge list of dotfile setups from all over GitHub. It is a real treasure trove of useful commands and potential workflow timesavers all in one place!
ZSH
Once you discover zsh you will never go back to a standard Bash setup. Zsh can be thought of as an extension to the Bourne shell. It comes with a whole heap of improvements and features from other interactive shells. The zsh website is a little bare, so I’d recommend you take a look at the oh-my-zsh GitHub page. It is a community-driven framework for your zsh configuration. It includes plugins, themes and other handy additions to improve your shell.
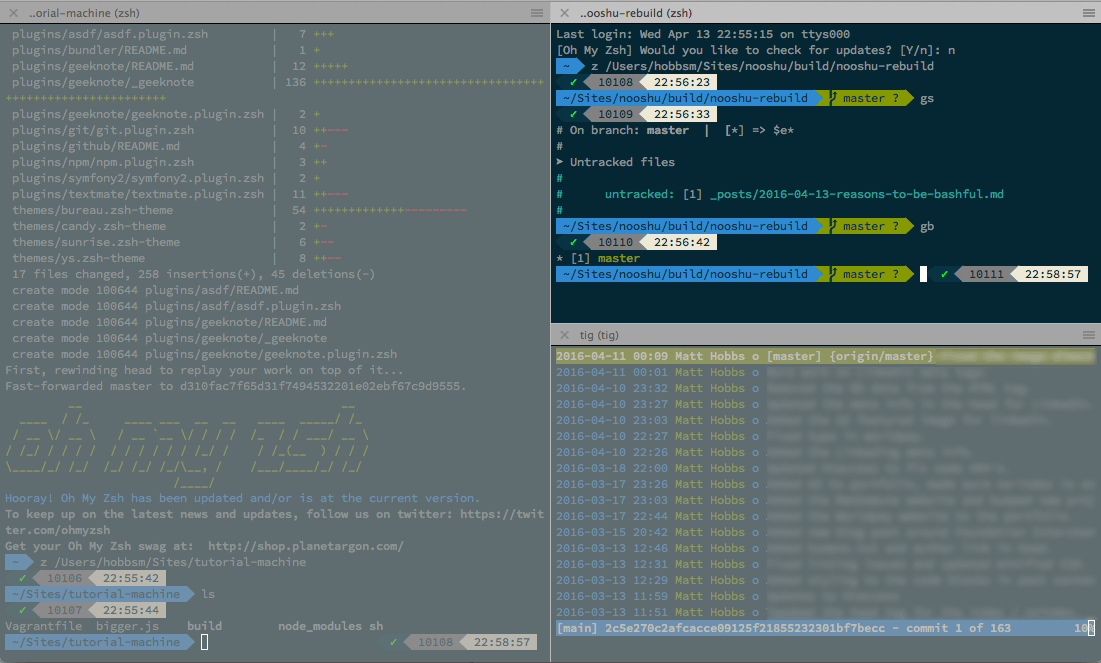
I personally use the powerlevel9k for my theme (seen above) with the git, vagrant, and npm plugins enabled. It is recommended you only enable the plugins you actually need as having too many enabled could slow down your overall shell experience.
As you can see the prompt looks very different to the standard Bash prompt, incorporating things like the time the command was run, where the command sits in the history, and many additions to make working with git easier. These are all customisable of course by editing your dotfiles.
Aliases
Now I must admit I don’t have many custom aliases (you will see the reason why later in the blog post). Here are just a couple of examples of how you can use aliases to speed up your workflow:
1
alias ipa="ifconfig | grep -Eo 'inet (addr:)?([0-9]*\.){3}[0-9]*' | grep -Eo '([0-9]*\.){3}[0-9]*' | grep -v '127.0.0.1'"
This command stands for “IP Address”, and it will give me the current IP address of my machine (or multiple if on multiple networks).
1
alias vus="vagrant up && vagrant ssh"
I use Vagrant on most of my projects, so I often find myself having to bring up boxes and halt them. This alias just allows you to bring a machine up then SSH into it quickly.
1
alias opens='open -a Sublime\ Text'
I’m primarily a WebStorm user, but whenever I want to quickly edit a file from the shell in a GUI I use the opens command: opens [filename]. Of course you could also use nano or vim if you wanted to just stick to the terminal.
Fasd
o here’s one of the reasons why I don’t have many custom aliases. When I first started using the terminal I found I had quite a few aliases related jumping in and out of specific directories around my machine. This is where Fasd comes in.
It is a productivity booster that keeps track of files and directories you have used recently. It even tracks how often you use them and ranks them accordingly. Very handy if you often edit the same set of files. Here are some example commands you could use:
f scsslist recent files matching the string “scss”d websitelist recent directories matching the string “website”a scriptlist files and directories matching the string “script”z imagescd into the most recently used “images” directory
If you are using it with zsh there is a little bit of additional setup to get it all up and running, but once it is you will wonder how you lived without it.
SCM Breeze
Here’s the second reason I don’t have many custom aliases: SCM Breeze.
When it comes to Git, the terminal is my first port of call. I’ve tried GUI’s in the past but have always reverted back to the terminal. Once you get your head around the basic commands it is fairly simple to use, and I also find it helps you understand the inner workings of Git a little more.
Now as much as I love typing, any way to speed up the process is big plus with me. This is where SCM Breeze comes in. It is a set of shell scripts that speed up your interaction with Git massively by adding a whole heap of useful shortcuts. From adding files to the staging area all the way down to branching and rebasing. For example:
1
2
3
4
5
6
$ gb - show a list of local branches ordered with corresponding number
$ gco 2 - check out branch number 2 from the list
$ gs - look at local staging status, files ordered with corresponding number
$ ga 1-5 - add files 1 to 5 to the staging area
$ <ctrl+x> c - commit the staged files, asks for a commit message
$ gps - push your branch to the remote
As you can see the above workflow is much quicker to type than with the standard git commands. For a full list of aliases available you can use the list_aliases git command.
Tig
One of the main advantages of using a GUI with Git is the ability to quickly look over all the commits across various branches to see what has been changed and by who. You can prettify the standard git log command which helps, but even that is still lacking. For a more comprehensive tool you should look at Tig.
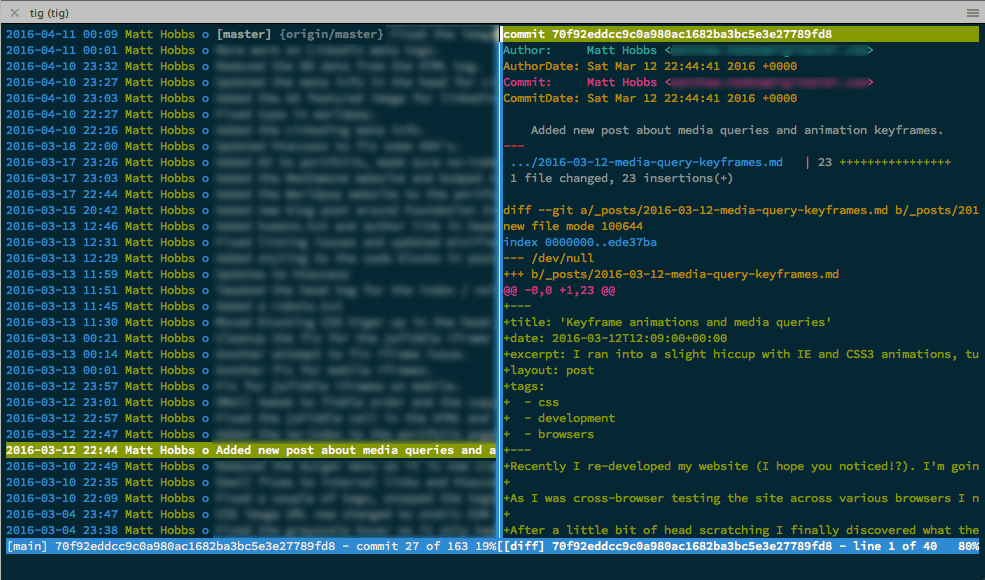
Tig is a text-mode interface for Git. Its primary usage is as a git repository browser, but it can be used for so much more. I’ve really only scratched the surface of what Tig can do as I mainly use it for a quick glance at commit diffs. I highly recommend you take a look at the user manual to see what else it can do for you.
iTerm2
So the standard terminal that comes with OSX is okay. It does the job, but there’s so much more you can do with it to improve your workflow. The tabs feature is handy, but it is still missing something. This is where iTerm2 blows the standard terminal out of the water. You can see an example of iTerm2 above.
iTerm2 comes with a huge set of features and improvements like autocomplete, search, paste history, and the hotkey window. But by far my favourite feature is the ability to have a set of split panels either horizontally or vertically. Once setup you can have multiple sessions visible at the same time. Great if you need to work on a project as well as SSHing into a remote machine at the same time. Multi-tasking win!
Learning Bash
So if you’ve never used the Bash prompt before, not to worry! There are plenty of resources on the internet to help you learn. Here are just a few that I have used in the past to get you started:
- Learn Enough Command Line to Be Dangerous
- The Bash Academy
- Bash Scripting Tutorial
- The Linux Command Line Book - Not Free
- How to Be a Terminal Pro Screencast - Not Free
- Advanced Command Line Techniques - Not Free
- Command Line for Non-Techies - Not Free
Hopefully you found some of my bashful ramblings useful! Let me know if there’s some essential terminal related tool or technique I’m missing, I’d love to hear about it.
†Maybe I’m doing it all wrong? Please contact me if there are some secrets or helper tools I’m missing out on, I’d love to give them a try!
Update
I recently stumbled across this blog post by Jilles Soeters from 2014. Both our lists are almost identical (which is quite reassuring), but there was a small addition that caught my eye. zsh-syntax-highlighting is an plug-in for Zsh that I had no idea existed. It highlights commands while you type them, green if they are recognised, red if not. Very useful indeed! I’ve now installed it and it works perfectly, so thanks to Jilles for the tip, and I highly recommend you take a read through his blog post too.
