Fixing a legacy HTTP/1.1 server configuration with Cloudflare Workers a CDN
So the configuration discussed in this post I’ve run into a couple of times recently while examining the performance of some websites you’d class as running on ‘legacy’ infrastructure. When a site is running on HTTP/1.1, you expect to see multiple TCP connections opened to download all the site assets. The HTTP/1.1 specification (RFC 2616) used to recommend:
A single-user client SHOULD NOT maintain more than 2 connections with any server or proxy.
But that RFC was later obsoleted by RFC 7230 which changed this to:
Previous revisions of HTTP gave a specific number of connections as a ceiling, but this was found to be impractical for many applications. As a result, this specification does not mandate a particular maximum number of connections but, instead, encourages clients to be conservative when opening multiple connections.
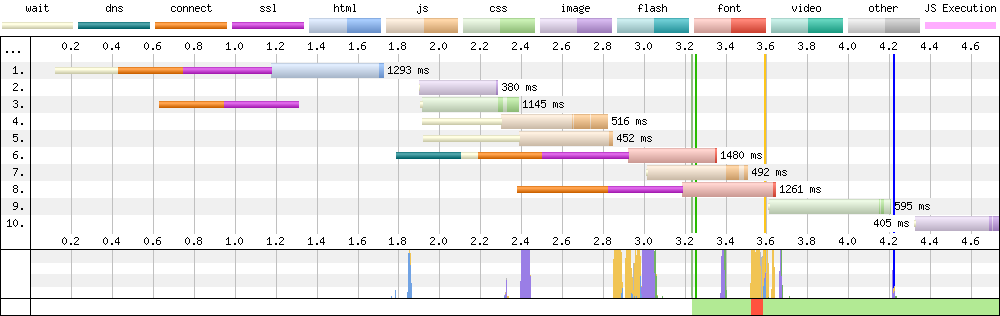
In terms of practical application by browser vendors they usually set the maximum number of connections to a single domain to 6. So if you see a waterfall that has a higher number than 6 connections to the same domain, that’s probably worth investigating:

In the WebPageTest waterfall chart seen above we have a total of 10 page assets being downloaded. But as you will notice from the orange and purple lines, there are 9 TCP connections established to do this! So what’s happening here?
The connection header
On examining this waterfall closer it was possible to verify the server was running HTTP/1.1 as expected. But I noticed there was also a problematic little response header included too: connection: close. We can refer back to RFC 7230 for an explanation as to what this header is doing:
The “close” connection option is defined for a sender to signal that this connection will be closed after completion of the response.
Put simply, for this page communicating using HTTP/1.1, the server is opening up 6 connections to download the page assets. The inclusion of connection: close response header means that these TCP connections can’t be reused for other assets after one has downloaded, they are simply closed. Another brand new TCP connection must be opened for the other assets. This isn’t good! One of the major improvements of HTTP/1.1 over HTTP/1.0 was the ability to allow TCP connections to persist across multiple asset downloads. So by including the connection: close response header you are basically bringing back HTTP/1.0 for your users.
TCP connections are expensive
Now you may be asking: “What’s the big deal?. How much difference can opening and closing multiple connections be?”. Well it actually has a big impact on a number of areas:
- Opening and closing connections takes up CPU time and memory on the server, client, and many other bits of hardware in-between.
- Congestion across a network is increased because there are more packets being transmitted purely to setup TCP connections.
- Web performance is decreased because there’s added latency when established a new connection to download other assets.
- More efficient TCP congestion control features can’t be used. Each new TCP connection suffers from TCP Slow Start).
By minimising the opening of new TCP connections you are improving both the web performance and battery life for your users. Focussing internally you will also be reducing load on your server and the overall network. Basically everyone wins!
Focus on web performance
Lets take some time and focus on the web performance aspect of this configuration. If only there were a way to modify the request / responses coming from our inefficient server config… Thankfully there is! Using a Cloudflare Worker we can do exactly that.
How does it work?
First and foremost lets get something out the way. It actually doesn’t. In this instance the Cloudflare Worker isn’t actually doing anything for us. And this is where I regret putting the technology used in the blog post URL! It makes things very hard to change if it needs to! First I think it’s important to go over how it doesn’t work, and give you an idea of where my mental model broke down:
How it doesn’t work
In my head I was seeing a Cloudflare Worker as a simple single layered black box that does everything for you. E.g. when a users connection is established they are connecting directly to the worker, and the worker is connecting directly to the origin. This isn’t how it works at all. The worker isn’t like a load balancer (which does pass through), it’s much more complex than that.
Lots of layers
First it’s important to understand that a connection is going through multiple disconnected layers, not just the worker itself. So for example the layers involved are:
- Browser communicates back and forth with the Edge nginx
- Edge nginx communicates back and forth with the Worker
- Worker communicates back and forth with the cache tier
- Cache tier communicates back and forth with the origin fetch servers
- Origin fetch servers communicates back and forth with the origin
Each tier manages multiple requests independently. Like a pub/sub queue. Actual connections are on both ends but completely independent. Because of all these layers, we can simply remove the worker completely as just using a CDN implements things like HTTP/2, keep-alive, and Brotli. CDNs can fix a lot of broken origin behaviors just by simply being in the path, which is exactly what happens in my use case mentioned in this blog post.
If there are any folks from Cloudflare reading this blog and you happen to have a diagram of all the above layers, that would be super helpful to see, so please do share it with me. I had a look around the web and most diagrams just seem to display a Worker as a single box full of hidden tricks. It would be great to look at all the independent layers involved to get more of an idea of how they work together.
The example worker
So even though the use case I mention doesn’t require a worker (only a CDN), I’m going to leave this section in as an example of how a Cloudflare worker works. For those of you familiar with Service Workers, a Cloudflare Worker is basically the ‘edge’ version of this API, with some limitations due to the environment not being the browser. With a little JavaScript you can write a fully programmable network proxy, allowing us to control how network requests from our pages are handled.
The example code run in the worker below is actually fairly straightforward:
// this is the site we are proxying
const site = 'www.example.com';

// do stuff when the 'fetch' event occurs
addEventListener('fetch', event => {
  event.respondWith(handleRequest(event.request))
});

/**
 * Respond to the request
 * @param {Request} request
 */
async function handleRequest(request) {
  const url = new URL(request.url);

  // x-host header added by WebPageTest when using overrideHost
  const xhost = request.headers.get('x-host');

  // if x-host header not found, abort
  if(!xhost) {
    return new Response('x-host header missing', {status: 403});
  }

  // set our hostname to that listed in the xhost header when using overrideHost in WPT
  url.hostname = xhost;

  // store the original response
  let originalResponse = await fetch(url, request)

  // create a new response to be modified (response properties are immutable)
  let response = new Response(originalResponse.body, {
      headers: originalResponse.headers,
  })

  // simple example of how you would add a custom header to the response
  // response.headers.set("x-custom-header", "header-value")

  // return the modified response
  return response
}
Then in WebPageTest we add the following script:
overrideHost www.example.com example-modifier.nooshu.workers.dev
navigate www.example.com
This script above is saying: when you come across any asset requested from www.example.com, route it through our Cloudflare Worker (example-modifier.nooshu.workers.dev) so the request / response can be modified accordingly. If you are interested in what else you can do with Cloudflare Workers, I highly recommend reading the blog post ‘Exploring Site Speed Optimisations With WebPageTest and Cloudflare Workers’ by Andy Davies.
What difference does it make to web performance
Now that we have a CDN sitting between the browser and the origin, we have the following setups available that we can examine using WebPageTest:
- Original config (HTTP/1.1 +
connection: closeheader) - HTTP/2 transformed by the CDN (
connectionignored or removed) - HTTP/1.1 transformed by the CDN (HTTP/1.1 +
connection: keep-aliveheader)
NOTE: To connect to the CDN using HTTP/1.1, you can simply use the --disable-http2 command line option in Chromium, so it drops back to HTTP/1.1.
So let’s see what difference it makes:
Page waterfall (HTTP/1.1 + keep-alive)
In the waterfall chart below we can immediately see the difference this makes verses the chart shown at the start of the post. Instead of 9 separate TCP connections to download 10 assets, we see 4. A reduction of 56%.
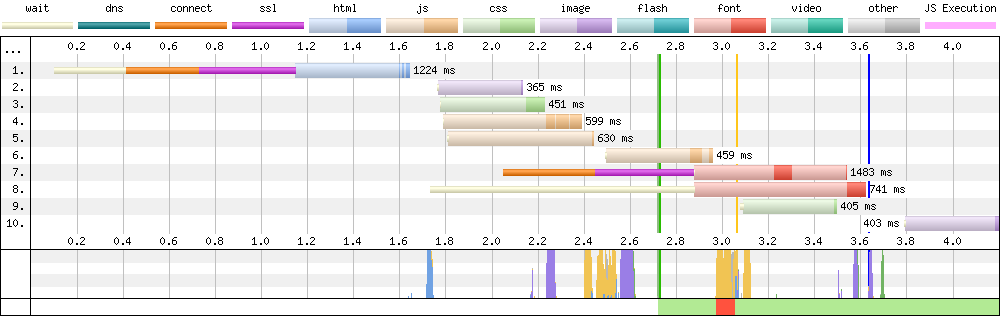
Page waterfall (HTTP/2)
While we are examining waterfalls, we may as well look at a H2 version for comparison. HTTP/2’s ability to multiplex streams over a single connection has reduced the TCP connections down to 2. The other TCP connection is the anonymous connection needed to download the web fonts.
Timings comparison
But where it all really matters is in the page timings. Here we can see a comparison chart with all 3 configurations visualised:
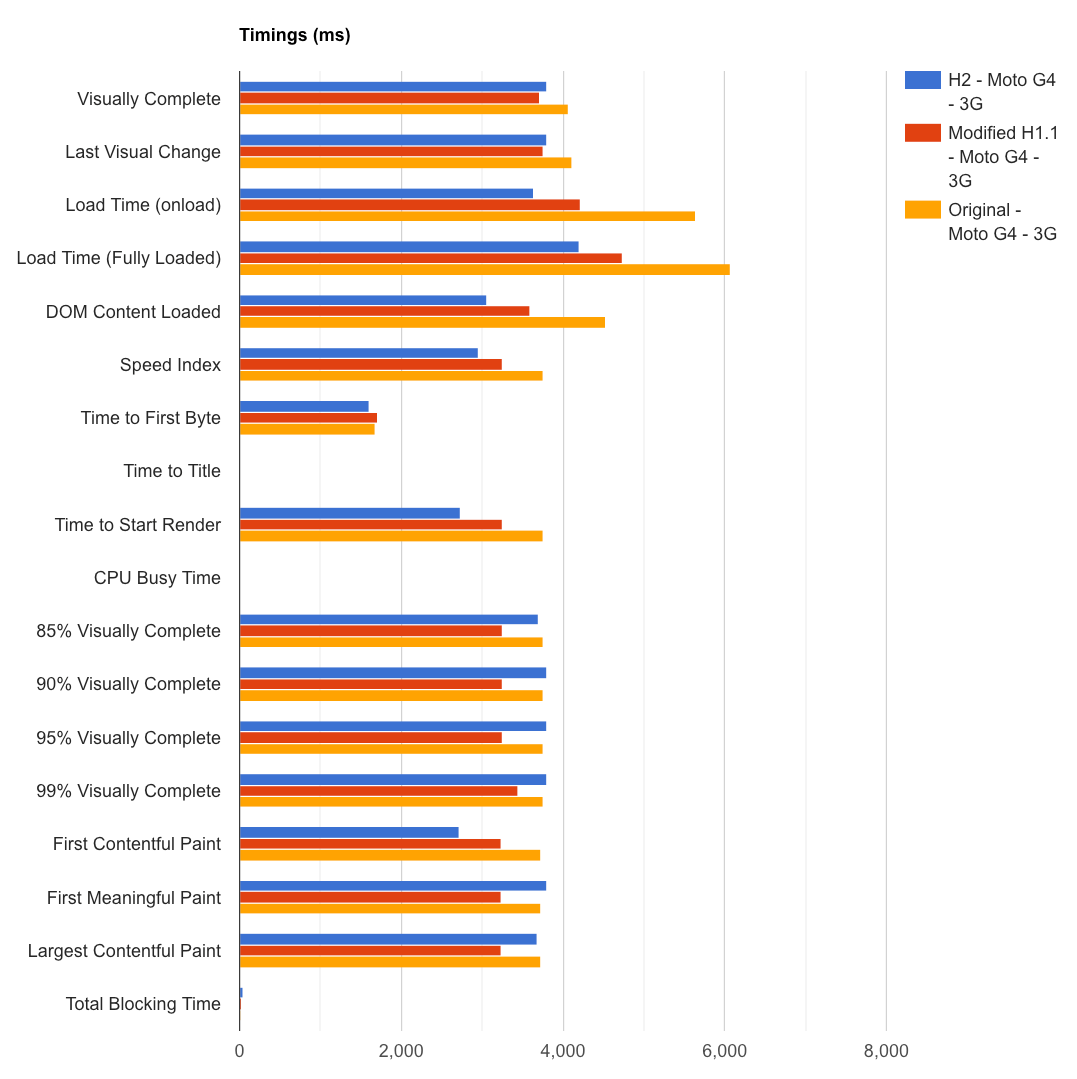
From the graphs you can clearly see that the original config (HTTP/1.1 + connection: close) is much worse for performance in almost all metrics.
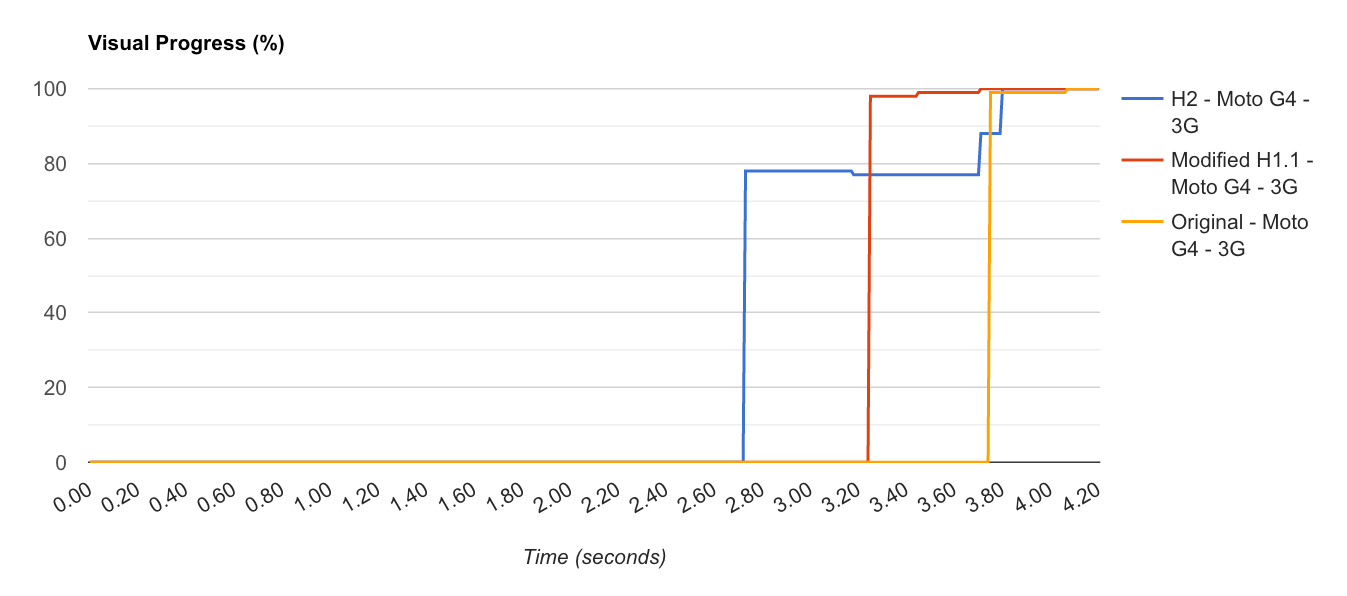
Visually progress comparison
From the visual progress graph below we get an idea of how a user with perceive the performance of the website. It’s easy to see from the graph that HTTP/2 is the winner. By rendering something to the viewport almost half a second quicker than our modified version of HTTP/1.1, and 1.1 seconds quicker than the original config! It’s also worth noting that with the original config the page is rendered in a single big bang. From 0% to 98% visually complete over what looks like a single frame. Where as H2 and H/1.1 + keep-alive build the page more incrementally. This is essentially giving a user something to look at on their device sooner. This is always a good idea as it shows that something is actually happening.
Testing
If you are wondering how you test to see if a server is configured with connection: close enabled, there are a couple of quick methods:
DevTools
Both Chrome and Firefox DevTools allow you to view response headers as separate columns in the ‘Network’ tab:

So if you see a row with ‘HTTP/1.1’ as the protocol, and ‘close’ under the connection column, then you know the server config isn’t optimal.
Curl
Or if you are looking for a way to test this via the command line then you can always use curl. Simply update the server URL and run the following command:
curl -sIX GET https://www.example.com | grep -E 'Connection|HTTP/'

# Output:
# HTTP/1.1 200 OK
# Connection: close
It will extract the information for you and output it to the terminal window.
Conclusion
Now I admit this blog post hasn’t actually ‘fixed’ the issue at the origin unless you plan on dropping a CDN in front of it (you should seriously consider doing this). But what it has done is give you actual performance data you can use to ‘build a case’ to get it fixed. If you report back to a business and / or management with graphs that show that by making a small change on the server both web performance and server load will improve. You could even use it to push for enabling HTTP/2 if a considerable improvement is seen, or even the use of a CDN.
It’s amazing what a difference a single header can make when it comes to web performance. There are probably so many ‘legacy’ server configs running across the web with this exact issue: where just a small modification to the config will make an enormous difference. So if you have a server that you know is still running HTTP/1.1, why not do your users (and your server) a favour and check you don’t have connection: close included in the response headers.
Post changelog:
- 01/11/20: Initial post published.
- 02/11/20: Update to mention that RFC 2616 was obsoleted by RFC 7230, which includes updated connection concurrency guidance. Thanks Barry Pollard.
- 02/11/20: Update to the post after a conversation with Pat Meenan. This version now calls out where my mental modal of Cloudflare Workers was incorrect and adds a bit more details on how it all works! Thanks (again) Pat!
